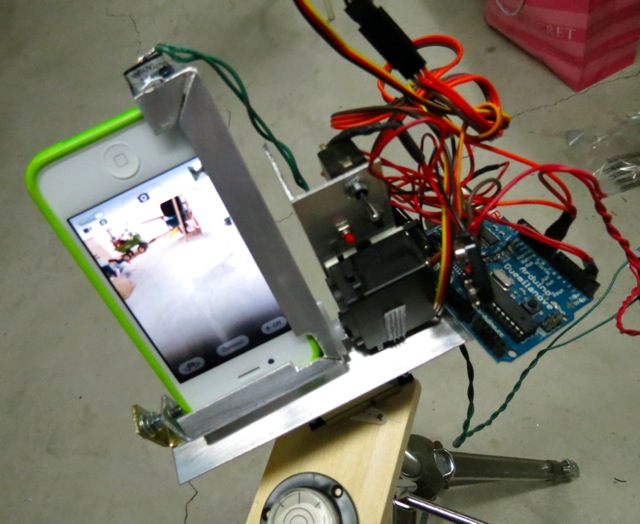
Apple’s new IOS 6 for the iPhone has built-in panoramic photography capability. This let’s you take hand-held panoramas. If you want to do it like the pros, you need a pan-tilt platform. As an example of the types of projects we want to develop in the Furman Physics STEM Initiative, we built a two-servo pan-tilt platform to hold the iPhone. The header image for this blog was taken with our gadget.
Arduino pan-tilt platform for iPhone panoramic photography.
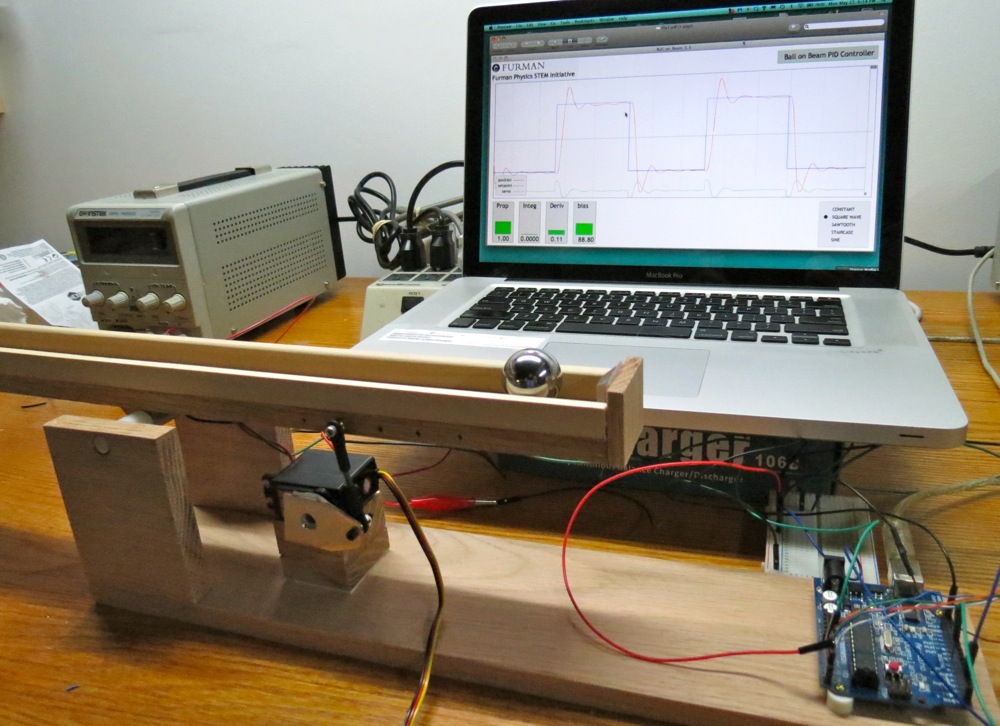
As an example of a lecture/showcase demo apparatus project, we show here the Furman Ball-on-Beam PID Controller. This device was assembled using fabrication techniques and construction philosophy borrowed from the Maker Movement.
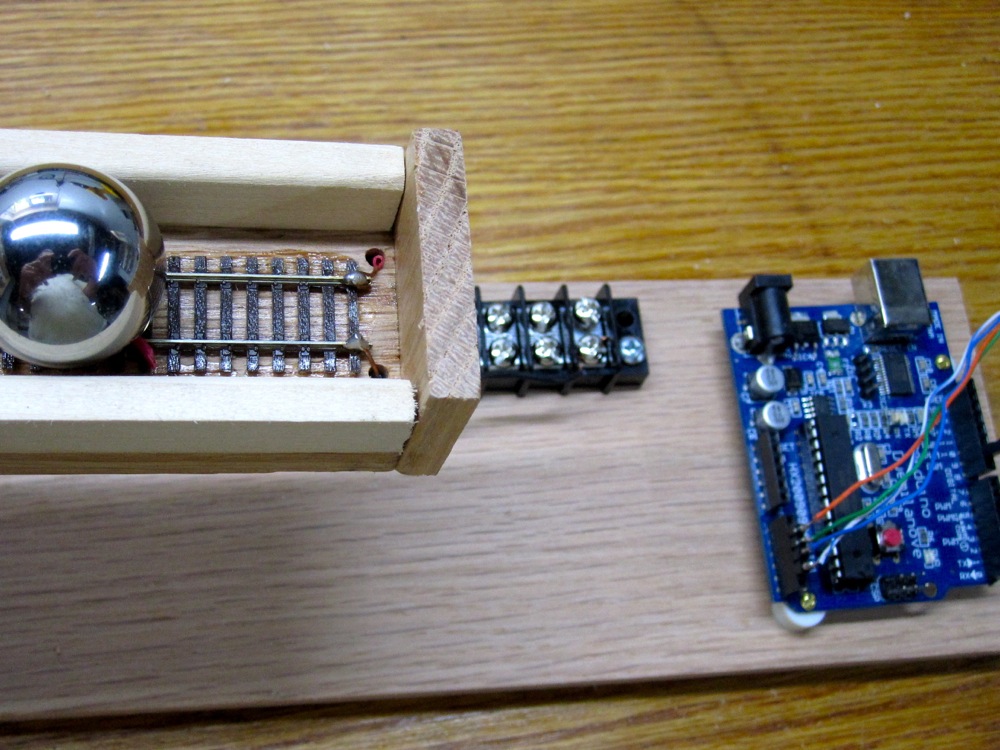
Arduino-based Ball-on-Beam PID Controller apparatus constructed using techniques borrowed from the Maker Movement.Closeup to highlight use of N-gauge model railroad track to provide an expensive source of a mechanically precise, electrically isolated dual rails.
In the spirit of the Maker Movement, the need to have a machine shop fabricate an electrically isolated pair of rails with high mechanical precision was eliminated by re-purposing a length of N-gauge model railroad track. Mechanical supplies were restricted to those obtainable from Lowes and Home Depot. The Arduino was purchased at Radio Shack, and the railroad track and servo were purchased at a local hobby shop.
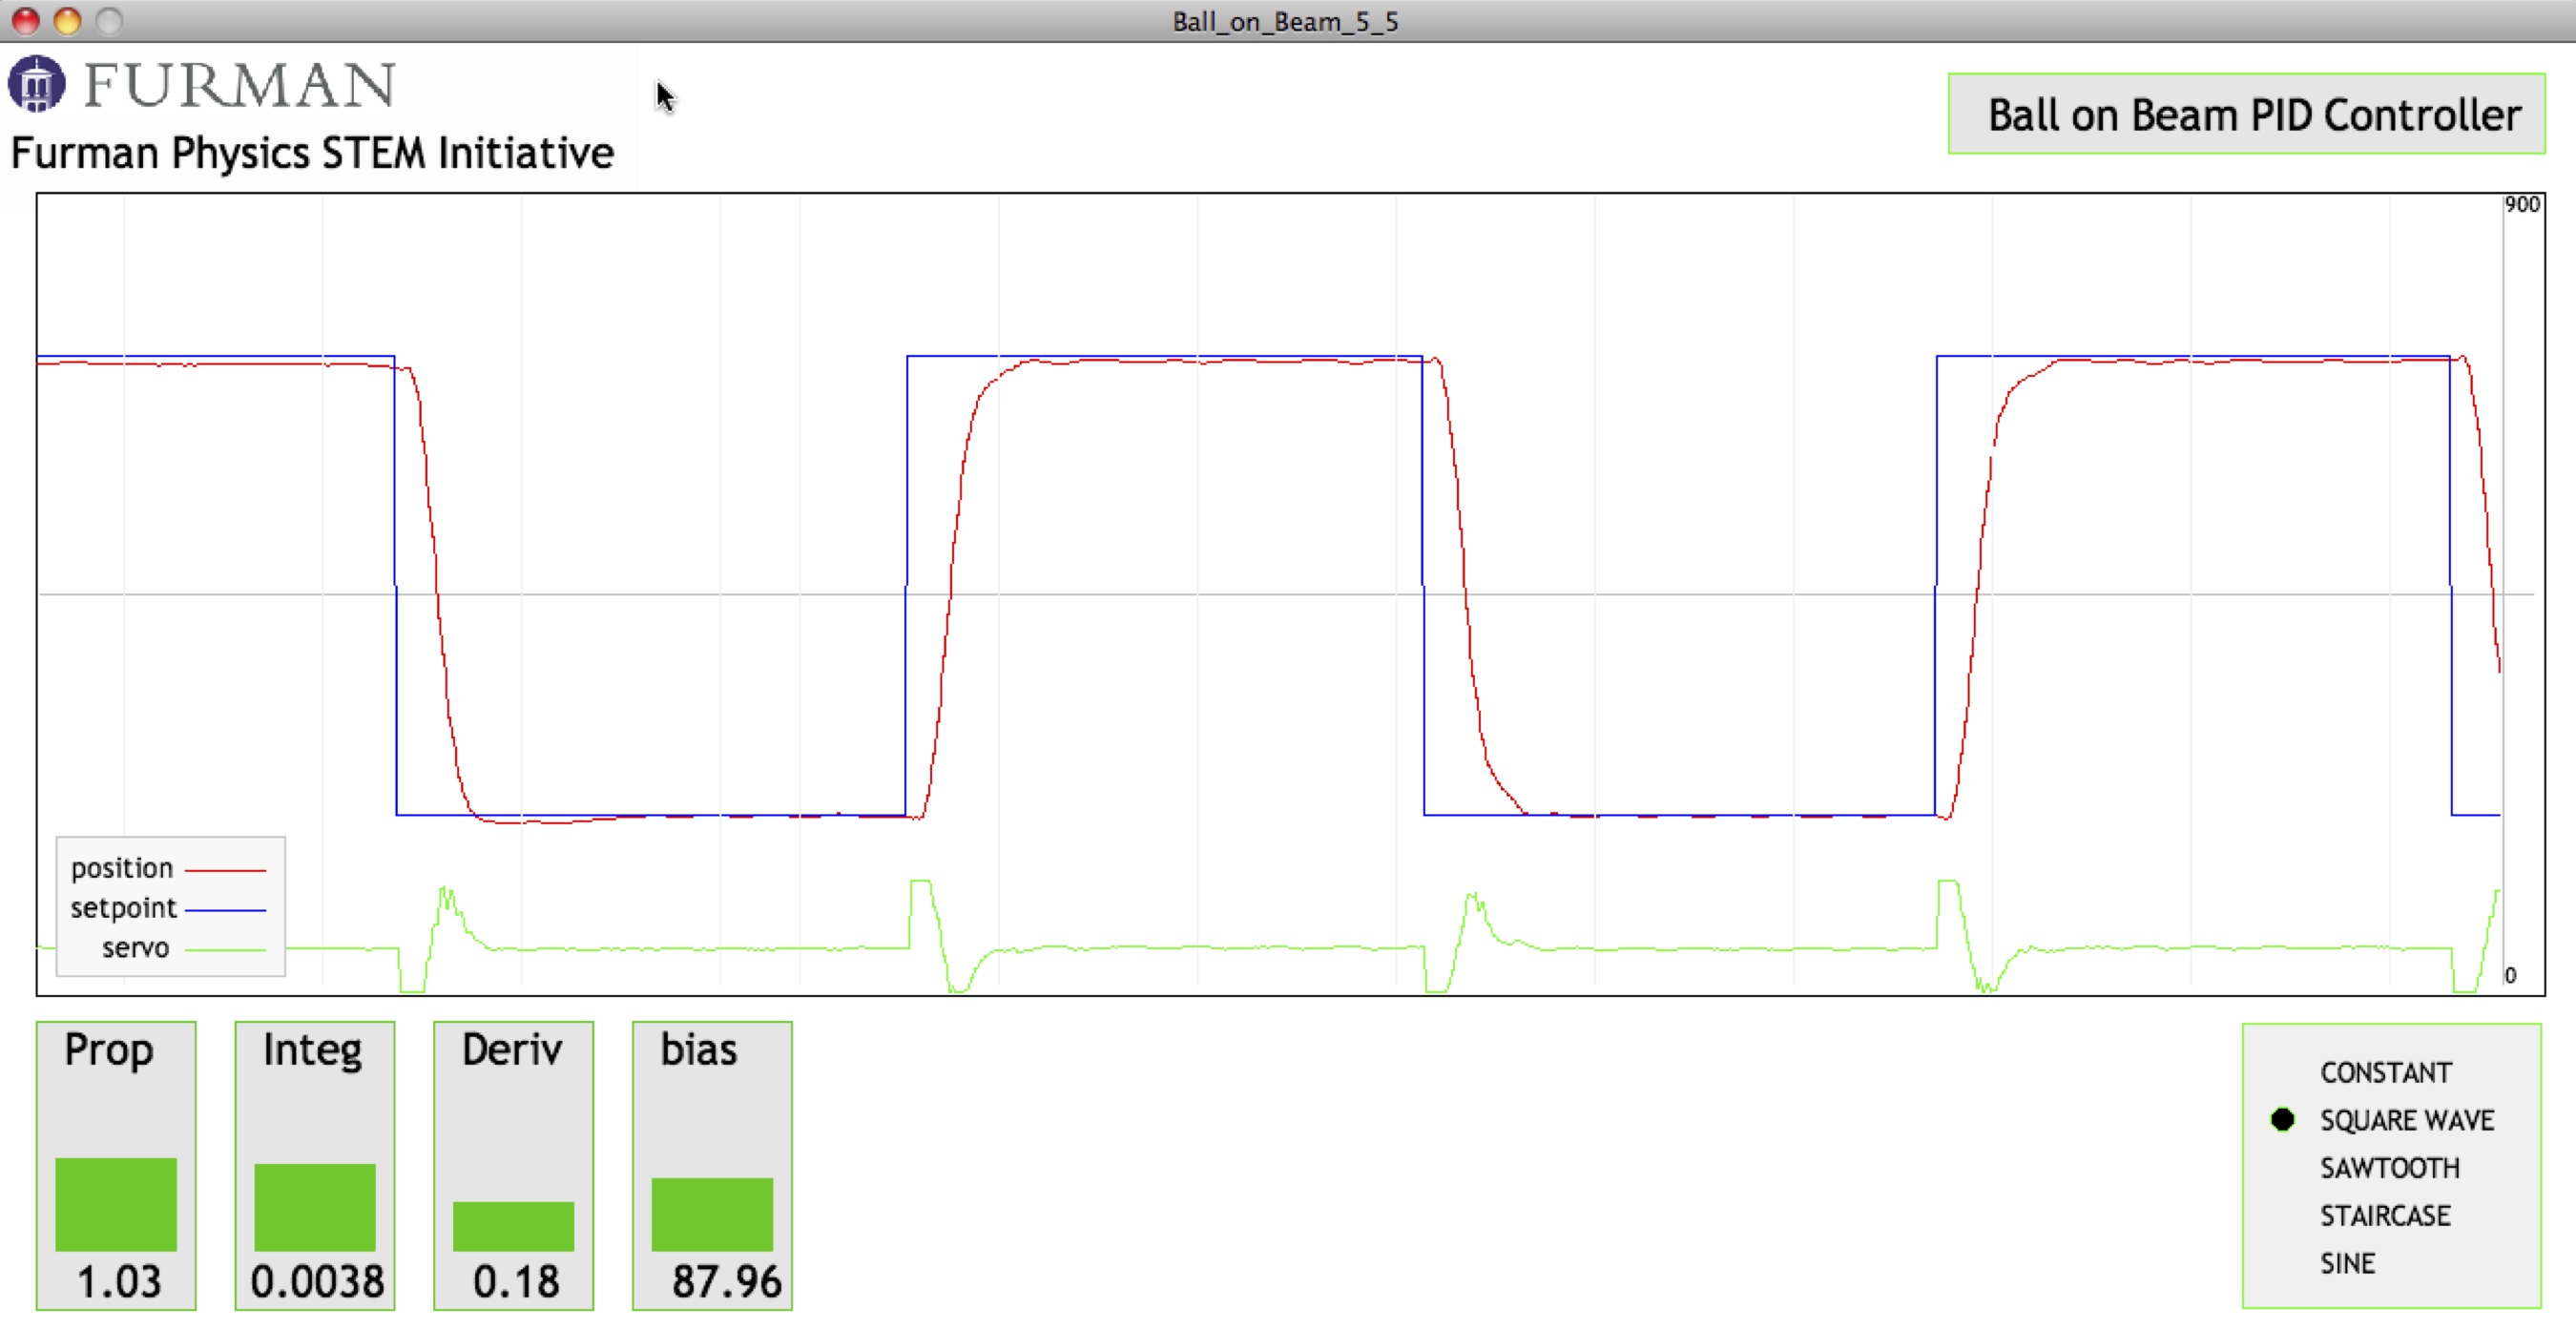
The objective of this project was to create a control system that could effectively balance a ball on a metal beam using a servomotor input to control the angle of the beam. The ball-on-beam balance problem is a classic open loop unstable system. For a constant input there is a non-constant output. A constant beam angle causes the ball to accelerate due to the force of gravity and the ball’s position increases non-linearly. The Arduino provides a closed-loop control system; a sensor monitors the system state (the ball position) and feeds the data to a controller that adjusts the beam angle as necessary to maintain the desired system setpoint. Utilizing this closed loop feedback, the controller is able to repeatedly and effectively balance the ball at the given desired reference point with reasonable transient performance. The P, I, and D parameters are chosen in the Arduino code to provide a feedback signal to the servomotor that depends on the error signal e(t):
e(t) = setpoint(t) – position(t),
where setpoint(t) is the desired position as a function of time, and position(t) is the measured position. With this input signal, the controller then calculates an output(t) to the servomotor given by:
output(t) = P e(t) + I ∫ e(t)dt + Dd/dt{e(t)} ,
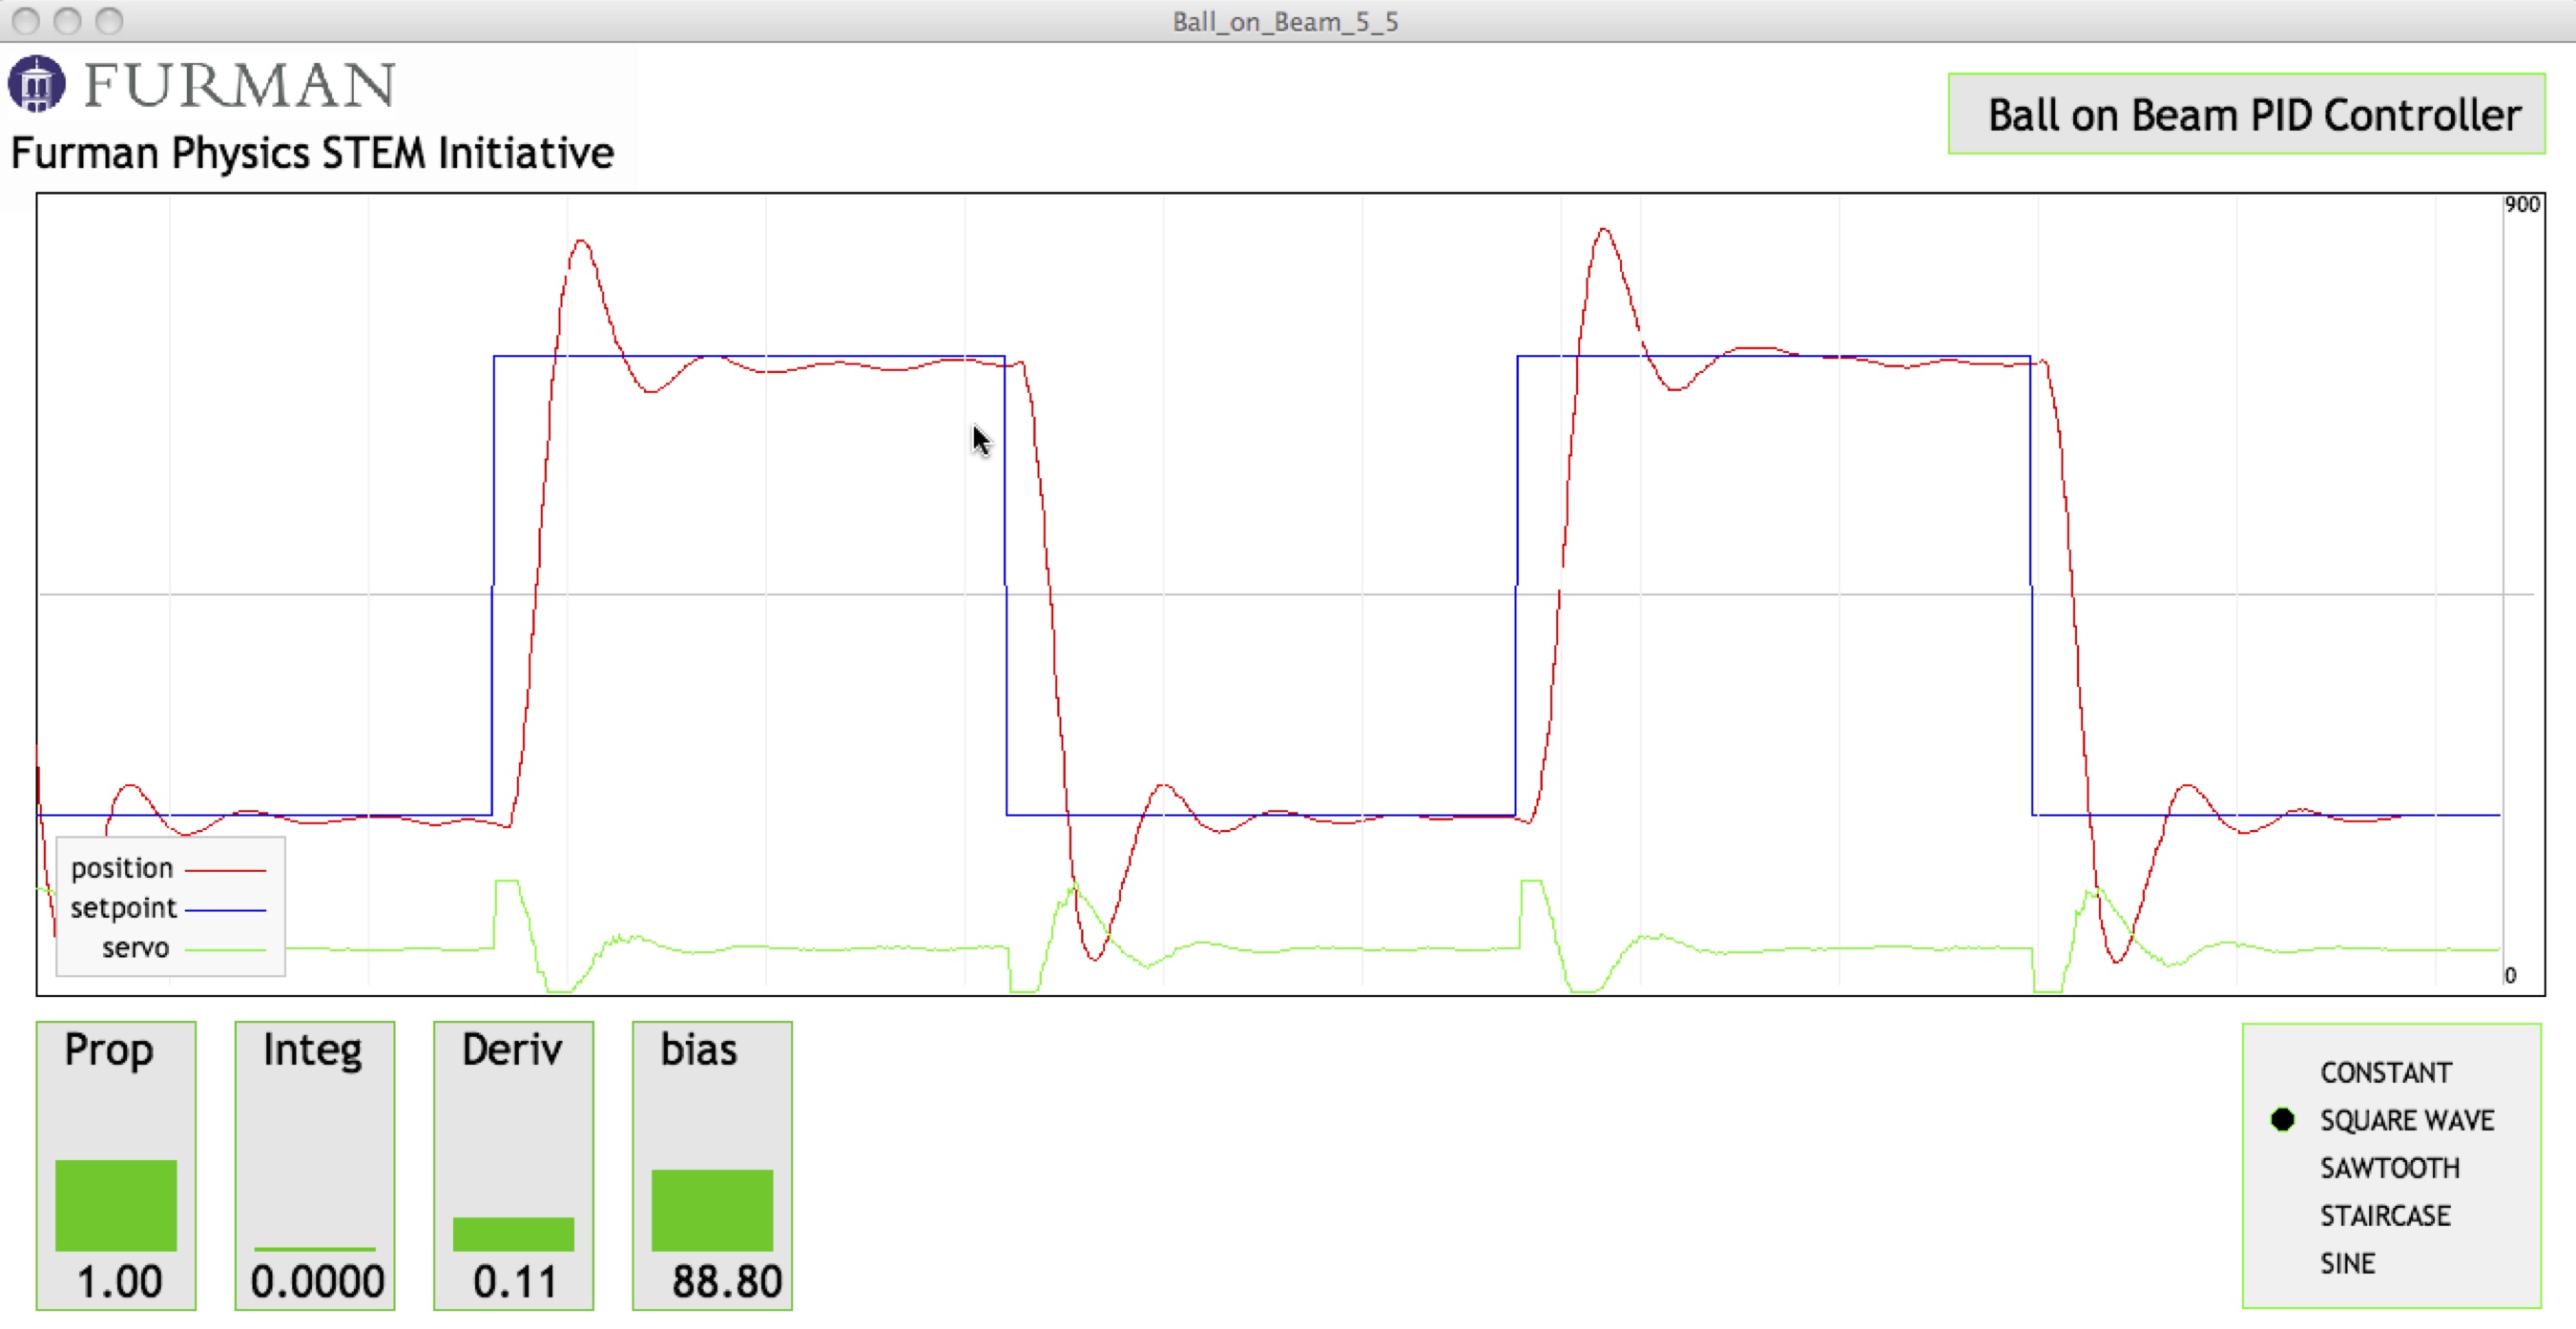
where P, I, and D are constants chosen in the Arduino code to provide an optimum feedback signal. The behavior of the system for non-optimized and optimized PID parameters is shown in below.
Processing IDE output strip chart data that shows the square wave waveform that is the setpoint for the process, and the actual position of the ball as a function of time. Because the values of P, I and D chosen here are not optimized, there is significant overshoot and subsequent “ringing” of the ball position.Here the values of P, I and D have been chosen to optimize the controller performance, resulting in much better compliance between the setpoint and actual position of the ball.
This apparatus serves as a very attractive model system for our students. In their first semester physics course, the ball-on-inclined-plane problem is a classic problem that students analyze in terms of a free body diagram, and then kinematic description. The sensor technology (digital/analog reading of the ball’s position from the potentiometric voltage divider provided by the ball and rail) is well understood by the students from their second semester physics course.
Arduino Projects to Enhance STEM Education in the Undergraduate Physics Curriculum
J. R. Conrad, W. Baker, D. Wang,
K. Pardo, H. Khan, A. Fant and E. Kostadinova
Department of Physics, Furman University, Greenville, SC
Abstract submitted to
American Association of Physics Teachers Topical Conference on Laboratory Instruction: Beyond the First Year (BFY) of College, University of Pennsylvania and Drexel University, Philadelphia, Pennsylvania, July 25 – 27, 2012.
These activities build on, exploit, and leverage the technology-based DIY/DIWO subculture of the Maker Movement to introduce embedded system Arduino technology at every level of the undergraduate curriculum, with the goal at a local level to increase by a factor of two the number of undergraduate physics majors at Furman. We hope to attract students who might not otherwise be inclined to major in physics. We believe that the material developed will be easily transportable to other institutions and will help to allow other institutions to also increase the number of students attracted to STEM fields generally, and in particular in undergraduate physics curricula. Although the specific projects we will explore are focused on the undergraduate physics curriculum, the approach and pedagogy developed will be easily adaptable to other STEM disciplines.
The strategic goals for this program address three issues:
Recruiting of qualified students into the undergraduate physics pipeline
Retention of those who enter the pipeline
Enhancing the quality of the education by providing an engaged, hands-on, project-based learning experience
In order to achieve the above strategic goals, we have identified the following seven categories of Arduino-based projects:
Augmentation and enhancement of existing laboratory experiments
Research laboratory apparatus
Lecture/showcase demo apparatus
Projects that interface with Mathematica & Labview platforms
Standalone consumer devices
“Internet of Things” devices
Robotics competition projects
Augmentation and enhancement of existing laboratory experiments
Most students in elementary physics courses are already using embedded systems devices in their laboratory courses, without being aware that they are using embedded systems! Data loggers such as the Pasco’s GLX and Vernier’s LabQuest devices (see Fig. 1) are in fact quite substantial embedded systems platforms. The problem is that students see them as what they are—namely black box devices with canned software so that all of the work is done for the student. The pedagogical problem here is that these devices do not engage the student in a meaningful way! Rather than trying to replace these devices in the laboratory curriculum, it is our plan to augment the existing set of laboratory experiments with meaningful extensions of the same material using Arduino-based experiences.
Example 1: Laboratory Apparatus
As an example of the second category of projects in our list of seven categories, we present here, unedited, the following summary paper submitted by Spencer Hawkins, who was exposed to the Arduino platform when he was a student in Professor Conrad’s Physics Phy-112 (Electricity and Magnetism) in Spring of 2010. We view this student’s experience, which was incubated in the Phyics 112 class (and then bore fruit six months later) to be an ideal example of the type of learning experience that we are looking for in this proposed work.
Spencer Hawkins
Furman Chemistry Graduate, Class of 2012
Automation of Spectroscopic Analysis of Boronic Acid-Sugar Complexes
The spring semester of my sophomore year I took Physics-112 Electricity and Magnetism (from Prof. Conrad), where I developed a strong passion for robotics and a desire to use this passion for developing practical applications. As a chemistry major, however, I wasn’t sure how to go about making this happen. Fortunately for me, I found out Dr. Springsteen was in search for someone to automate his lab and thus I applied for a Furman Advantage grant.
Dr. Springsteen’s lab was trying to find a boronic acid compound with a unique absorbance signature when bound to a sugar molecule, like glucose, such that it can be used to quantify a person’s blood sugar concentration. As boronic acids are cheaper than current diabetes testing strips, which use the enzyme glucose oxidase, finding this perfect boronic acid has tremendous benefits for everyone with diabetes.
Unfortunately, for each new boronic acid, spectroscopy, or subjecting a sample to light has to be performed on each new sample at a variety of sugar concentrations and across a range of pHs. Because of this large number of experiments that need to be run, the total number of boronic acids that can be tested is limited.
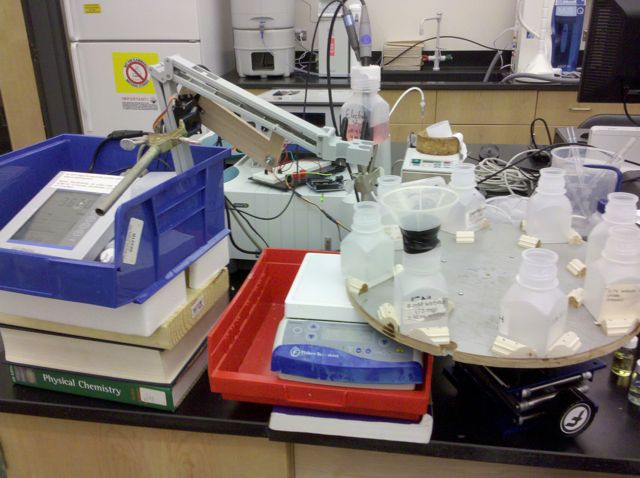
This summer, I set out to build an auto sampler that would hold six boronic acids, a cleaning solution, a buffer to store the probes once finished testing, and automatically perform spectroscopic analysis on all compounds overnight. During the first half of the summer, I designed the autosampler and ordered all necessary parts. In the end I decided it would be best to have a carvel wheel (built by Joe Ashley in the machine shop) to hold all eight solutions and rotate by a servomotor mounted in the center and have a robotic arm controlled by a servomotor raise and lower the probes up and down into the solutions. All of these motors would be controlled by an Arduino microcontroller.
Within a few weeks I had the majority of the project almost completed and things, like one of my motors, began breaking. The rest of the summer was spent tweaking the robot to either fix or add new functionality. (See Fig. 2 below.)
The biggest thing I learned throughout this project is how things rarely go according to plan and the need to adapt when they do. Initially I was going to use a stepper motor to rotate the wheel, however, after weeks of soldering the motor to the driver and tweaking code, I realized that the motor lacked sufficient torque to turn the wheel adequately and I was forced to buy a new completely different geared motor, requiring me to redo all my code and soldering. The same problem occurred with the servomotor mounted to the robotic arm, while it performed perfectly without the probes in all of my test runs, with the additional weight the motor stopped providing accurate movements, rendering it useless. I am now in the processes of ordering a new motor to fix the arm. These problems, although hard to foresee quickly eat away at ones patience and make you want to give up sometimes, but like in the real world, no one else can complete your project, as everyone else in my lab was a chemist, so I had to fix the robot anyway.
In the end, while the robot isn’t turning out quite how I expected it to, this gave me a good idea of what life would be like as some sort of engineer. While I enjoyed the designing stage and getting the motors to function, the testing stage where all the small details had to be hashed out and fixed turned to be incredibly frustrating and has reaffirmed my previous desire to go into medicine. I greatly appreciate the opportunity Dr. Spingsteen and Furman Advantage have given me this summer to pursue my passions.
Arduino-based robot auto sampler summer research project by Furman student Spencer Hawkins. Spencer was a student in my Physics 112 course.
Example 2: Lecture/Showcase demo apparatus
As an example of a lecture/showcase demo apparatus project we describe here the Ball-on-Beam PID Controller shown in Fig. 3. This device was constructed using fabrication techniques and construction philosophy borrowed from the Maker Movement. In the spirit of the Maker Movement, the need to have a machine shop fabricate an electrically isolated pair of rails with high mechanical precision was eliminated by re-purposing a length of N-gauge model railroad track. Mechanical supplies were restricted to those obtainable from Lowes and Home Depot. The Arduino was purchased at Radio Shack, and the railroad track and servo were purchased at a local hobby shop.
The objective of this project was to create a control system that could effectively balance a ball on a metal beam using a servomotor input to control the angle of the beam. The ball-on-beam balance problem is a classic open loop unstable system. For a constant input there is a non-constant output. A constant beam angle causes the ball to accelerate due to the force of gravity and the ball’s position increases non-linearly. The Arduino provides a closed-loop control system; a sensor monitors the system state (the ball position) and feeds the data to a controller that adjusts the beam angle as necessary to maintain the desired system setpoint. Utilizing this closed loop feedback, the controller is able to repeatedly and effectively balance the ball at the given desired reference point with reasonable transient performance. The P, I, and D parameters are chosen in the Arduino code to provide a feedback signal to the servomotor that depends on the error signal e(t). The controller then provides a feedback signal as a signal output(t) to the servomotor given by:
We consider this prototype system to be an excellent way to introduce our beginning students to embedded systems applications because the basic physics is in fact, quite basic. The dynamics of a ball rolling on an inclined plane is a classical first-semester physics lecture and homework problem. Similarly, the position sensor input to the Arduino is a potentiometer resistor voltage divider formed by the two rails of the railroad track; this is a classical second-semester physics lecture and homework problem.
Example 3: Consumer devices
As an example of the consumer device project, we describe here the Arduino iPhone Pan-Tilt Camera Platform shown in Fig. 5, and an example of a panoramic photograph of the Furman Townes Science Center take with it in Fig. 6 on the following page.
Fig. 5. Arduino-based Pan-Tilt camera drive platform for the iPhone panoramic photography device.
Fig 6. Panoramic photograph of the Townes Science Center complex at Furman taken with the Arduino Pan-Tilt camera platform.
Example 4: Atmel Robotics Competition
The last example we present is the work of a team of four Furman students (Kristina Pardo, Haris Khan, Eva Kostadinova, and Andrea Fant) who submitted in May 2012 a proposal in response to the request for proposals for the 2012 Atmel Robotics Competition. A figure from their proposal is shown in Fig. 7. It should be noted that Atmel is the manufacturer of the microprocessor chips used in all Arduino micro controllers.
Fig. 7. Aldo, the conceptual design submitted by the Furman Robotics Team for the 2012 Atmel Robotics Competition.
Distribution of Information
In addition to traditional methods of dissemination of our results, we have established the Furman Physics STEM Initiative blog site that we hope will become a major meeting ground and clearing house for curriculum development activity in physics education (see Fig. 8).
Fig. 8. The Furman Physics STEM Initiative blog site: https://blogs.furman.edu/physicssteminitiative/about/:
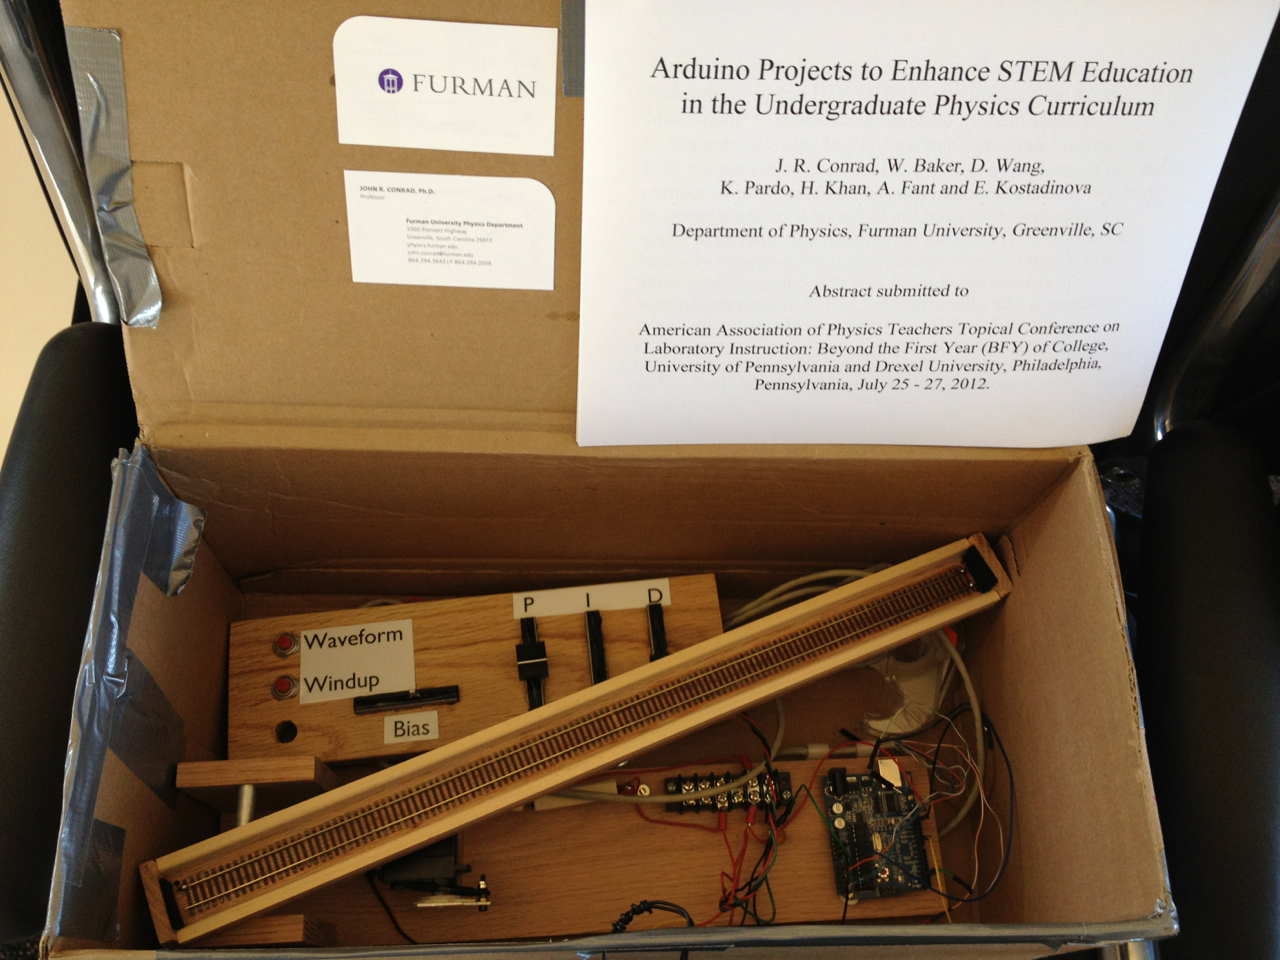
As I prepared for the AAPT Beyond First Year conference (see the next post, above), I had some trepidation about how to get my show-and-tell Arduino PID gadget to Philadelphia without incurring the wrath of the TSA! Turns out, it wasn’t that big a deal, at least not for me, thanks in part to the fact that I had read the extensive discussion of this issue at the Arduino forum. I’m glad I took the time to follow the recommendations there. All I endured was having to wait a few minutes while the TSA did the chemical swab wipedown of the hardware. Other attendees at the conference weren’t quite so lucky; several experienced long delays, and one grad student had components confiscated from his carry-on luggage!
Waiting for my flight from GSP to Philadelphia. Here's the carry-on luggage box with my Furman business cards plastered all over the box...... and with a copy of the poster session paper inside so that TSA might be reassured!